Showing posts with label choices. Show all posts

Thursday, August 22, 2013

Drywall and Trim Work Oh My!

Well I haven't updated the blog in quite a while because it seemed like all the progress came to a screeching halt! We found out that was mainly due to my cabinetry being backordered from the supplier. You would think that since we have had the plans finalized since June this wouldn't have happened, but if I have learned anything in the building process it's that there are always many moving parts to getting something done and if one falls behind, then it's a domino effect for all. That is kinda frustrating, but I keep reminding myself: "We are building the dream. We are building the dream. We are building the dream!" I know it will all work out. While we waited on cabinetry the drywall was installed, mudded and taped, sanded, primed and then painted with the first coat. I think normally they would not have painted a first coat, but do to the cabinetry delay they had to go ahead and paint. Seeing the drywall go up was really crazy! I was so used to just walking between the studs when I was at the house, that seeing actual walls and closed rooms was really strange. Strange, but in a good way :) I know I have said it before, but we had no idea how big the house was going to be and we had commented on that during the framing and insulation stages. However, now with the walls up, that hits home even more. How could I possibly have ever thought this might not be enough space?!! I guess seeing something on paper and seeing it in real life are just so different! Well, after that tangent, lets get back on topic: drywall. Here it is in all its glory!


Living room connected to the kitchen. Love that the fireplace is the focus of that wall.


Living room from another angle. Looking into the kitchen and breakfast nook.


Dining room with the gorgeous window and great view!


Master bedroom with lots of light and the view!


 Laundry room with door to the outside.


Bonus room or bedroom #5. Picture does not do it justice. I could do gymnastics in this room it is so big!

 
Media room/Greg's man cave. So glad we didn't do the vaulted ceiling! We would not have had this whole extra room.

Arches starting to be trimmed out around doors and windows. Wasn't crazy about the little circle things at first, but I think they will be ok once they are painted.


Master bedroom trey ceiling getting beautiful crown moldings.


Living room ceiling before the coffers went in.
 
 
I was at the house the night before to look around and take the previous picture. I come by the next day at lunch and they already had this much done! Impressive!

 
Coffered ceiling is pretty much complete! So pretty!
 
Chair rail and picture boxes in the dining room along with the crown molding.


Living room ceiling and custom built mantle. The trim guy just said, "What do you want?" Then he did this! Gorgeous!

 
Up close of the mantle. Love how it is boxed out with the picture frames that tie it in to the dining room and breakfast nook trim work.

 
Columns on the dining room walls. Again they mirror the rest of the trim work. The trim makes the house feel so high end! I am just loving it all!


So even though we got a pretty slow start to August, there has been a lot of work done these last two weeks! I am just so excited! I cannot believe that I will live here soon! We are going from building the dream to living the dream so soon!
 

Tuesday, July 16, 2013

Cabinetry colors and countertops

So I posted about my cabinetry layouts a while ago so I felt it was time to finally unveil my cabinetry colors and  countertop choices as well :) It was quite a long and confusing process for me to pick the cabinets and I won't bore you with all the details. However, I will say this: Go into the design phase having an idea of the look you want! I repeat, know the look you want! Otherwise, the design phase will be exponentially harder. I am living proof!!

Greg and I both thought we wanted a pretty modern kitchen with cabinets that were Shaker style and had very little detail to them. From countless hours on Houzz we found out that we are a transitional style. Basically a fancy way of saying we straddle traditional and modern in our design aesthetic. We aren't totally one way or another, we like elements of both. Like most people today we appreciate the modern design elements everywhere but like to keep them grounded with traditional pieces. Knowing this you might say, well Laura, sounds like you have a good idea of what you like and went into the kitchen design phase pretty well informed, and you would be right. However, this knowing your "style" doesn't take into account two factors: price and just falling for something you didn't see coming. See that is just what I did. I fell for some pretty traditional cabinets that are not really that modern look we were going for. Then to top it off I looked at Shaker style cabinets and didn't love them! Crazy right?!! The price on the shaker cabinets did me in too. They were so much more than the traditional cabinets! So here I was with a huge problem on my hands. I fell for something I didn't see coming but I still wanted that "transitional style" kitchen. How was I going to make that happen if my cabinets were so traditional?

So I talked with our kitchen designer and she suggested we try and find a way to balance out the cabinets with some more modern elements. Since our kitchen is huge and had two islands we decided to do the prep island in a different cabinet. Read: dark color and a more modern style. Making that choice I was worried that the mix of cabinets would be strange, but now the more I have thought about it, the more I like it and think it will look great.


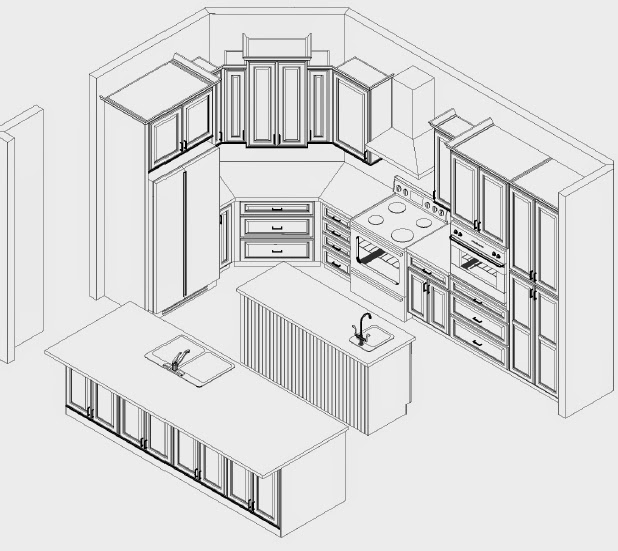
Here is a reminder of the kitchen layout. The kitchen wall and the larger island is going to be in the Madison White.  The smaller prep island will be in the Kent Birch espresso. The color and style for both is shown below.


Madison white cabinets from the manufacturer's website.


Prep island cabinets

So we decided we would bring in more of the modern touches with appliances and hardware.
This handle has pretty clean lines and is modern without being overly modern. So it will work on the white and espresso cabinets.

Next we had to decide what countertops we wanted to use. Well like a dummy I started researching granite, quartz, marble, soapstone, and butcher block. Well I have very expensive taste it seems and quickly gravitated to the soapstone and butcher block! Eeek! For those of you who don't know, Soapstone is one of the best countertop options out there. It is stain and heat proof and never needs sealed like granite or marble. It is used often in chemistry labs because it will not interact with the chemicals. It has an amazing silky feel hence why it is called Soapstone. It's one drawback is it can be kinda soft and chip or scratch. However, this can easily be fixed by sanding it down. Yep that's right, Soapstone can be sanded down! I love that! I think it is awesome that if it gets chipped or scratched I just take out my handy dandy power sander with some fine grit sandpaper and go to town! Or I could leave the scratches and chips and it will add some patina to the kitchen. Either way, I love that there are options. Also, to naturally darken the Soapstone from a Grey/Charcoal to a Dark Grey/Black you can oil the stone with Mineral Oil or Wax. Soapstone gradually darkens over time anyway and the mineral oil just speeds up the process.

 
 Here is a slab that I really like. It has veining that is somewhat similar to marble and "freckles" or dark charcoal areas. I like that it has movement and some depth without being "busy".


Another close up of the slab that shows the veining and color differentiation a little more. However, when you look at the whole area and not up close it just reads gray/charcoal which is exactly what I wanted. Unfortunately these slabs are gorgeous and my camera is just not doing them justice!


My plan is to use the Soapstone on the Madison white cabinetry and to use butcher block on the prep island. Some people like the look of butcher block and some do not. It really appeals to me because I love that it is practical and the whole countertop is a cutting board. The only drawback is I am kinda funny sometimes and may grow to not love all of the knife marks and wear and tear it shows. The great thing about butcher block is if I so choose, I can also sand it down and get rid of the marks. I think this is amazing. I love having options! Additionally, I think that the butcher block top which will be lighter would be a nice contrast with the dark cabinets of the island.


 Sample of a butcher block top similar to what I like. This is beech wood and would be sealed like the Soapstone with a food grade mineral oil or wax.

So many people say they would not cut on their butcher block countertops and I think that is the reason to get them! I love that I can seal them, meaning protect them and bring out the gorgeous grain of the wood, but still use them. I think there is something beautiful about a kitchen that is a "living, working Kitchen" and not just a show piece. So butcher block is an excellent choice for me.

For our master bath we are going to do the Madison white cabinets with a soapstone countertop.
For bath #2 we are going to do the Kent Birch Espresso cabinets with a soapstone countertop. In bath #3 we are doing the Kent Birch Espresso cabinets and a Silestone solid surface countertop in Alpina White.

Here is a picture of the Alpina White. It is actually two different shades of gray so not sure where the name comes from. I like the gray and think it will go well with the tile we picked out that is a creamy white with gray swirls in it.
All of the bathroom sinks are going to be under mount and rectangular like this one. I just love these! It is a little more modern and will help bring that into our bathrooms.

Getting excited! We have picked so many things and it is really starting to become real. I just hope all of my choices will blend together well! I guess we shall see :)

Friday, June 14, 2013

Cabinetry layouts

So excited! We finalized the cabinetry layouts today! Yay! I have been so excited to design the kitchen, so I thought I would share our layouts for the kitchen, baths and laundry room as well as our appliance selections.

 Kitchen layout looking in from the living room. Cabinets also on the front of the island for extra storage!


Kitchen view from side. Love that I am going to have two islands. Also, going to have an eat in area on the right side of the kitchen or closest to the prep sink in the smaller island.

 View from the top. The opening on the left side near the fridge leads to the hallway and the formal dining room. Right side is a bunch of windows and patio door.

Main island-10 feet long!
 
Prep island-6 feet long


Master bath makeup vanity for me and double sinks. So excited to have my own sink! No more whisker hairs in my sink :)

 Bathroom #2 vanity. This bathroom serves as the main level guest bath and also has a door from my office.

Upstairs bathroom #3 vanity. The vanity is separate from the tub/toilet area so more than one person can be using the bathroom.

 Laundry room set up. We are actually flipping the sink and appliances, but you get the idea right?! More storage :)

Appliances: Dishwasher, Fridge, Microwave/oven combo, Hood and Slide-in Gas range


Monday, March 18, 2013

Choices, Choices!!

So we recently met with our builder out at the site to show us the exact location of the house on the lot. Boy were we super excited about that!! To our chagrin, the house was no where near were we had talked about it being with him on the lot and to top it off we received some bad news :(  He said if we wanted to keep the 3 car garage the house would have to stay where he had it positioned and even then we may not get it! He was strongly, and I do mean STRONGLY encouraging us to scrap the three car garage all together.  Greg and I wanted the house as far forward as possible on the lot so that the backyard was big for the dogs and the (someday) pool. Dreamers, yes we are :) We talked with the builder about all the possible options and left with heavy hearts. It is so hard to hear something you had counted on isn't going to happen.

 I know it sounds bratty asking for a three car garage, as so many people make do with a two car, one car, or (like us currently) no garage, it's just we have a lot of vehicles. Again, another statement that could be construed bratty, but I don't mean it that way. We have our two personal vehicles, Greg's work vehicle, and my parents old MGB that needs completely redone. Where are we supposed to put all of these vehicles?!! Pretty sure the neighbors would prefer that the hillbillies don't move in next door with all kinds of vehicles (some not functional) everywhere.

So as we drove back home we talked and talked about what to do. Both of us were on the fence about what made the most sense for us now and in the long run. There was another wrench thrown into these plans as well. There is a bonus room above our garage that was originally going to be bigger with the three car garage. We had planned, down the line, to put an on-suite bathroom in this room since the one downside of the house plan was that it currently only has one full bathroom upstairs. Mind you this is not a huge problem now since it is just the two of us building a castle in the sky (yep I just went there ha ha) but down the line I can see that as a big issue with a couple kiddos. So if the garage went down in size it also meant that the bonus room would too and the potential space for a bathroom. Eek!

It seems we debated forever until we both just threw in the towel and decided that yard space was much more important to us than garage space. After all, nine or ten months ago I began the campaign for a new house with a big fenced yard and doggy door for our two pups. Wouldn't it just be so ironic if we kept the three car and the yard was smaller?! We both thought so too, without any human babies in the picture our dog babies are really like our children and their needs are important too!

With that being said, I still had several reservations. Where would the extra vehicles go? Where would all of the lawn stuff go? As of now, we have decided to make the cement pad in front of the garage bigger so Greg's work vehicle can just stay out there and my car can get out of its bay ok. Maybe not a perfect solution, but bottom line is the yard for the pups was a bigger priority. Who knows maybe we will have vehicles everywhere and the neighbors will just have to deal, but for now we have found some peace with the decision. As for the extra bathroom down the line, that remains to be seen. The room is still large and there is a big walk-in closet in the room next door we could take some space from, so when the time comes we will just have to figure it out! It's building the dream, but nobody said everything was gonna be perfect and we had to have it all figured out right now after all:)